Project Tracker
- Doug Bates

- Dec 22, 2021
- 10 min read
Updated: Feb 16, 2022
This file is available in our store. Contents:
Structure using automated split screen with linked tables
VBA Techniques using worksheet events, contextual paths, faux controls and more
How It Works for usage tips
Purpose
Business projects commonly span several months and even years, with weekly status meetings tracking a seemingly endless list of tasks and updates. When Excel is used as a tracking device, it’s usually thrown together with little forethought or design, setting the stage for spreadsheet abuse.
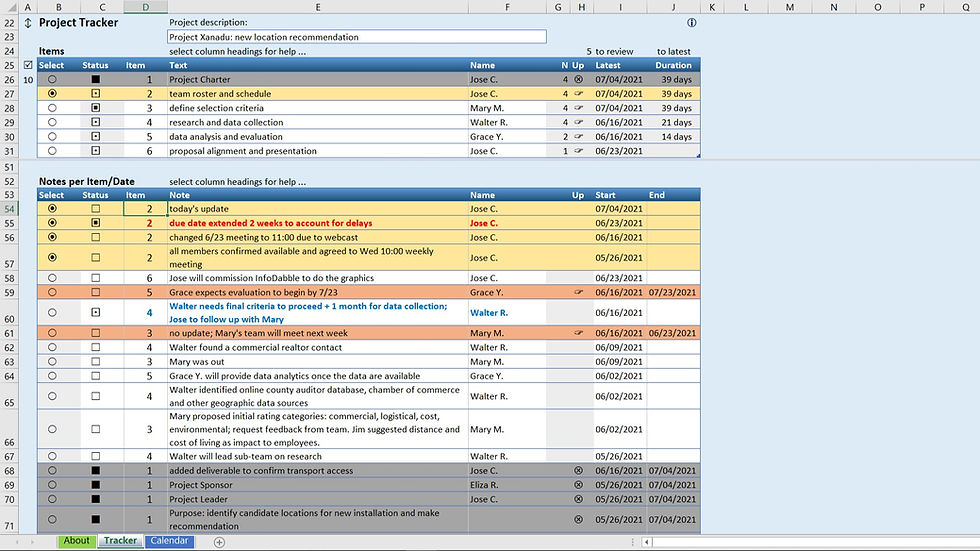
An ad-hoc project sheet might look something like this: a few columns on the left containing a few words describing the main item, and a column on the right snowballing weekly updates. The “details” cell has dates and names mingled with long, wrapping text, consuming the screen height and unbalancing the left and right sides of the screen. Add disregard for alignment and you have a candidate for the ugliest spreadsheet award.
Functionality is also lost. The only way to update notes is to edit the monster cell, and use strikethrough or bold or font color to add or remove emphasis. Dates and names are lost in the text and cannot be used. Team members struggle to grasp the real status or to look up their to-do’s. Team leaders struggle to convey the project status and hold members accountable. No doubt there exist formal tools to manage this, but they are unknown or inaccessible to many managers. This case is ripe for a solution.
Structure
The two-tier structure of headings and details brings to mind common relational database examples: Accounts and Transactions; Customers and Orders; Orders and Items. Just look at the receipt from your last shopping trip. The natural orientation is a vertical stack. The header and footer give the one-record sale view, with the store, amount, date and method of payment. The middle has the linked variable-length view of items. You would never expect to see header and detail side by side.
So, how can we implement a vertical one-to-many structure? There are ways to use a second view or to split a sheet, but the user is bound to lose their way trying to scroll and track records between the two. There must be two tables dynamically linked to focus attention on selected records in both. There must also be simple, intuitive controls that can be learned in minutes and executed in seconds. This is definitely a good case for a VBA project.
To begin the design, I define and separate the levels as two tables, naming them “Items” and “Notes”. The key field “Item” will be a number connecting the tables with a many-to-one relationship from Notes to Items. As the primary key, Items[Item] must be unique; each Item has one and only one row. Notes[Item] is the foreign key; it must exist in Items[Item], but there can be many Notes for the same Item. Automated insertion will obey these rules, and Data Validation will enforce the law in case of manual maintenance.
After considering some display options, I decide to split the sheet into top and bottom panes for the two tables. As I list the fields of interest in each table, several are common and can be passed between them: a selection indicator should be set in Items and passed to Notes; Status should be set in Notes and reflected in Items; dates are set in Notes and summarized in Items. The structure should reflect the purpose of balancing attention between two levels, while minimizing data entry.
The two tables will have the same number and types of columns so that the width and formatting will look natural in both. This is important for visual balance, and to ensure that as records are inserted and deleted in the top table, the bottom table is shifted down and up, maintaining the separation between them.
User input will be limited; text descriptions, names of team members, and target due date if known. Other columns will be set by formula, or by a VBA mouse event. Symbols and Conditional Formats will be used to help minimize the need for interpretation.
VBA Techniques
Worksheet Events
This is a case where the user needs to interact with individual records and get a relevant program response. Using controls to run the code would be clumsy at best. To enable context-sensitive execution, I look at worksheet events that capture the target cell. For example, when the user selects or right-clicks or double-clicks a cell, these are all separate events that can be programmed based on the cell address.
Event procedures are pre-defined. With the Sheet selected in the VBA Project Explorer, the code pane has two drop-down lists. In the first, select Worksheet, then open the second to see all the events. To review how they work, I write simple programs for the most interesting events. Then I return to the sheet and play around to trigger the events. Here’s an example, with test code:
Private Sub Worksheet_BeforeDoubleClick(ByVal Target As Range, Cancel As Boolean) MsgBox "BeforeDoubleClick target = " & Target.Address Cancel = True End Sub
Some interesting behaviors noted:
BeforeDoubleClick and BeforeRightClick replace the default action with the custom action when Cancel = True, and precede it when Cancel = False or omitted
BeforeDoubleClick Target is a single cell
BeforeRightClick Target can be single or multi-cell
Change captures the new value, after the change
Change captures multi-cell change via Ctrl+Enter (but cannot return .Value)
SelectionChange does not capture active cell change within a selection (via Tab or Enter)
The SelectionChange event would appear useful to run code with a single left click. However, it can be confusing to click the same cell again and nothing happens. Further, it is triggered by any navigation – arrow key, page up, home, etc. It can be programmed to run only on certain targets, of course, but I want the commands to be intentional and not triggered inadvertently. For these reasons I decide not to use SelectionChange.
After some more experimentation, I assign general usage categories by event:
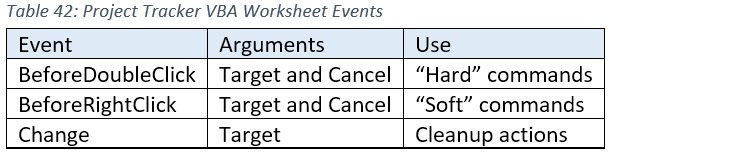
When the Target address is used as a program condition it provides contextual functionality. The code will react based on the location of the target cell. If the user double-clicks in the Select column it will do one thing, if they double-click in the Item column it will do another. Thus, the event procedure needs to first determine where the target cell is relative to reference ranges, then have multiple paths based on the result.
The pre-named event routines are the gateway to the sheet module and provide the means to direct the program without user controls. For simple actions they contain the direct commands, and for more complex or reusable actions they call other subroutines.
Contextual Paths
My first task in establishing contextual paths is to determine the context. Target gives the interacted cell. To find what table and column it’s in, I need a range variable representing each column’s data range. There are many, here is one example using a naming convention of I=Items, C=Column, Sel=Select, Rng=Range: ICSelRng is the data body range of Items[Select].
Dim Tracker As Worksheet Dim ITable As ListObject, ICSelRng as Range Set Tracker = ActiveWorkbook.Sheets("Tracker") Set ITable = Tracker.ListObjects("Items") Set ICSelRng = ITable.ListColumns("Select").DataBodyRange
I use the Application.Intersect method to tell if Target is within the range. Here I’ve made a Boolean function to simplify, since I use this a lot.
Private Function Within(Target, Rng) As Boolean If Application.Intersect(Target, Rng) Is Nothing _ Then Within = False Else Within = True End Function
Then, within the BeforeDoubleClick and BeforeRightClick Subs, I create multiple segments, each headed by a go-to location name and where each operates independently, like a Select Case block. For example, if Target is within ICSelRng, it will call a subroutine, cancel the default action, and exit. If Target is not within ICSelRng, it goes to the next segment header, runs Within on the next interactive column, and so on.
target1: If Not Within(Target, ICSelRng) Then GoTo target2: Call Sub... Cancel = True Exit Sub target2: If Not Within(Target, ICItmRng) Then GoTo target3: ...
This gives clean separation of the code applied to each column or other action range.
Faux Controls
Controls such as checkboxes and option buttons are good when they have a stable range to live in. When you want them to appear at the record level you can simulate their appearance with symbols, creating what I call “faux controls”, text characters that look like controls that you can manipulate and format as desired within the cell. Using mouse events the symbols can be modified and used in both program logic and sheet formulas and formats.
“Symbol” fonts, Symbol, Webdings, Windings, etc., have a lot of good options to choose from. They can be selected such that they sort up or down in a way that makes sense to the user, if necessary. If they’re used as a toggle, like Selected and Unselected, then sort order is no matter. If they form a series, test to be sure how they will sort before settling on the symbols.
Each set of symbols is proprietary to the column it’s used in, and each character is defined in Name Manager as a constant, for example:
Selected = CHAR(158)
The table below lists characters used with the symbols in Wingdings 2 font.
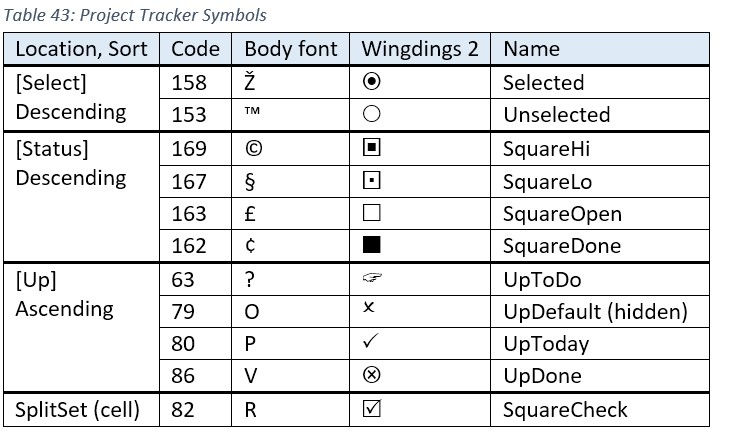
As an interesting watchout when working with symbol fonts, beware that the symbol is evaluated by its value, not its appearance. The name UpToDo appears as a hand pointing right in Wingdings 2, but is actually a question mark character when viewed in the formula bar. When I wrote a formula to count the remaining “UpToDo’s”, it returned the full number of records in the column, not just those with the UpToDo character. I was puzzled until I realized that “?” is a wildcard. To get the count of actual “?” characters, it must be preceded by a tilde character, as in
=COUNTIF(Items[Up],"~"&UpTodo)
I had to trick the [Up] column symbol set into sorting UpToDo at the top, followed by the default records. Originally I left the default blank, which sorted them first. To sort as intended, the UpDefault character code has to be between 63 and 80. I chose 79 for the sort, and used Conditional Formatting on the column to hide the value when it is UpDefault.
I use the same names in Name Manager and in VBA, but a little differently. In Name Manager, the names refer to CHAR(Code), and are then used in formulas as both input and output:
Items[Up] =IF([@Status]=SquareDone,UpDone,IF(COUNTIFS( Notes[Item],[@Item],Notes[Up],UpToday),UpToday,UpTodo))
In the VBA module, the name is a constant that refers to the code value. This is then used to read (via Asc function) and write (via Chr function) the character. The following segment unselects all Item records, then selects the target record.
Const Unselected = 153, Selected = 158
...
Set TmpRng = Tracker.Cells(Target.Row, ICSelRng.Column)
If Asc(TmpRng) = Unselected Then
For Each c In ICSelRng.Cells
c.Value = Chr(Unselected)
Next
TmpRng.Value = Chr(Selected)
End If
The split-screen feature uses the same symbol toggle technique, combined with an action routine. There is a checkbox-like cell SplitSet for the toggle, and a numeric cell SplitRow to set the row number to split on. SplitSet is toggled upon DoubleClick, which triggers the Change event, which calls the SplitWindow routine. A change in SplitRow also calls SplitWindow.
I also need a Boolean to tell me if the screen is split or not, and to keep the symbol aligned to the state. To convert the value of the SplitSet symbol to a Boolean, I create the name SplitFlag, TRUE when SplitSet has the SquareCheck symbol.
SplitFlag =SplitSet=SquareCheck
Sort Table
The tables have the filter buttons turned off. Selection acts like a filter, and I pre-define logical multi-column sorts. The RightClick event on any column header activates the custom sort. The Sub first uses Within to tell if Target is in the table header, then Select Case Target.Column to tell which column.
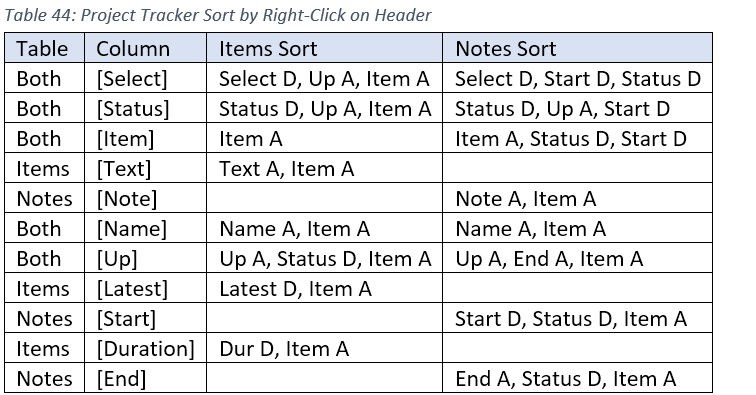
Some double-click actions also perform a sort. For example, when Items[Item] is double-clicked, a new Note record for the Target Item is inserted; then both tables are sorted by [Select] first, then by two other columns to call appropriate attention.
Split Window
It is important to maintain the split window well. The split is the key to the dual-table interaction, so it is refreshed whenever a record is inserted or selected, as well as when the SplitSet or SplitRow cells are changed. It is also called by the Calculate event, which checks that the Split property equals the SplitFlag setting, in case Split was manually removed. Sub SplitWindow() uses ActiveWindow properties .SplitRow, and .ScrollRow with .Panes(1) and .Panes(2) to maintain screen balance.
Set Date Format
Date format options are important for international users. As in other projects, I use two picklists to select date order and separator, each with three options, defining nine total formats. These could be done with Conditional Formatting, but the code method is more secure. SetDateFormat() is triggered by the Change event in either DateOrder or DateSeparator. It uses nested Select Case statements to set one of nine values to the .NumberFormat property of Range(“Items[Latest],Notes[[Start]:[End]]”).
Conditional Formatting
Conditional Formatting can get messy when ranges are deleted or copied and pasted, etc. They are also hard to extract for documentation. In VBA I can make them easier to maintain and protect them from errors in code. It is easiest to record while setting, but once the pattern is known the logic of the dialog can be copied and edited, considering the sequence and StopIfTrue setting.
Most Conditional Formats involve fill and/or font colors. The themed color palette has ten colors with six shades each. The tooltips show the color names and the shade as a percent lighter or darker than the standard color. In VBA, the color is a name or number from the xlThemeColor enumeration, and the shade is a decimal value, positive if lighter, negative if darker. The Colors sheet in the Startup File project explains more and gives enumerations.
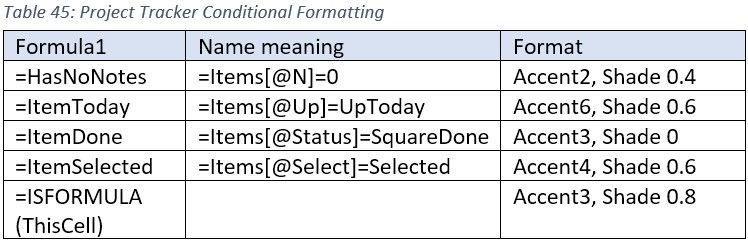
Sub FormatItems() applies five rules to the Items table:
Sub FormatNotes() similarly applies rules to the Notes table.
How It Works
The first step is to enter the items as the main tasks or deliverables of the project. Fill in the blank rows, then double-click on an item text to insert the next number.
Start adding notes for each item by double-click on the item number in either table to insert a new note for that item, with today’s date.
To set note status, right-click the status cell to cycle between empty square (low), small square fill with blue font (medium) and large square fill with red font (high).
To flag a note as complete, double-click the status. Double-click again to reset.
To conduct a regular review, double-click the first item in the Items table. This creates today’s note, which is flagged green. Enter text in the note, flag status and set end date as needed. Double-click the next item, and repeat. You will see the remaining items to be reviewed until you reach the end and all items have an update today. If there is no update today for an item, you can choose either to record that with a note, or skip it.
Support
If the user follows the normal process there should be few problems, but they can manually change things that can cause inconsistencies. One of these is orphan notes. Items and notes are like parent and children. If the item is deleted, the notes become orphans. These are flagged with dark red and a message appears above the Notes table. There is a small column in both tables that counts the corresponding records from the other table. In Items, it’s the “N” column. In Notes it’s called “It” but is hidden. There can only be one item per note, or 0 if the note is an orphan. The user doesn’t need to see this, its only use is to count orphans, which is displayed above the table.
The cells labeled ↕ are DoubleClick toggles to expand and collapse the row group at top for more information. This contains some settings, a color legend, an action and symbol legend, and space for header notes about the project.


Comments